Tutoriales: The GIMP

Me parece meojor si en ves de dar paginas pongan los tutoriales aqui..bueno aqui dejo un tutorial de como hacer una firma asi:
gandalfos6.png

TUTORIAL
Estoy deacuerdo con vos y mirando la firma q pones te digo q es de lo mejorcito q he visto hecho con GIMP.

El poner los tutos aqui mismo le da vida al foro, y no se puede decir q son pocos los q usan GIMP pq es todo lo contrario.
 
Estoy deacuerdo con vos y mirando la firma q pones te digo q es de lo mejorcito q he visto hecho con GIMP.

El poner los tutos aqui mismo le da vida al foro, y no se puede decir q son pocos los q usan GIMP pq es todo lo contrario.

pero si son pocos los que aportan o colaboran con este programa :(:(
 
Otro tutorial muy bueno
FUENTE

Here is my second tutorial:

To start off you will want to use a forward facing render (it’s okay if the edges are choppy as long as the rest of the render looks good). Paste your render onto a large image (1000 x 1000 or whatever you want as long as you leave lots of room so you can get the full effect) as a transparent layer.
gaara1.jpg

Duplicate the render layer then run Noise>Pick at 50 and 50.
gaara2.jpg

Now Image>Transform>Rotate image 90 degrees CW. Now use Filters>Distorts>Wind at whatever settings look good you want as long as you keep the style on wind with the direction on Left. (You’ll want it to be BIG though) Now do Image>Transform>Rotate Image 90 degrees CCW.
gaara3.jpg

Now run another pick, but this time set repeat to 100.
gaara4.jpg

Duplicate your picked layer and place the duplicate behind the render. Run a pick with 25 randomization on this layer. Then do a Gaussian blur of 3 on both pick layers before desaturating them.
gaara5.jpg

Now go to your render layer and select: Layer>Transparency>Alpha to Selection then Select>Shrink 5-10 pixels. Now activate you’re quick-mask (The box in the lower left hand corner) and do a Gaussian blur of 30 then a pick with a repeat of around 45.
gaara6.jpg

Deactivate the quick-mask and clear selection (Ctrl + K) on the top layer then Gaussian blur that layer by 3.
gaara7.jpg

Ready for the finishing touches? I bet you are; so let’s finish this. Now go to the top layer and do Layer>Transparency>Alpha To Selection. Feather your selection by 5 and delete this from the render layer; erase the other parts of your render which don’t look good with one of the fuzzy circles.
gaara8.jpg

Create two black layers and merge your picked “Flames” onto them. Set the two aura layers as screen and duplicate them both three times. Leave your uppermost copy alone, Gaussian Blur the second by 10, the third one by 20 and the fourth by 30. Do this for both “flames”. Merge down the flames then Layers>Colors>Colorize for both layers. Finally go to Filters>Colors>Color To Alpha and select 000000. Now erase where it doesn’t look good, crop your image etc.
gaara9.jpg

Optional: For a little more depth create a sparks layer and set this to overlay (Desaturate this layer if you aren’t doing Red/Orange/Yellow for a color theme) Then Alpha to Selection you’re top aura layer, Invert Selection, and Clear Selection on the sparks layer.
gaaraop.jpg
 
ma parece que teneis razon para la proxima los monto aqui mismo....
____________________________________________________________________________________________________

A mi si me gusto el tuto de [LME] XTRM el efectico de encendido ta aspero....ademas como he dicho antes lo importante en un tuto no es el resultado sino el proceso que se aprende ya seguro que se pondran hacer muchas cosas con el.
 
Otro tuto
autor:
Kasami
Ok this is what it is gonna turn out like:
kassig4ww.png


Note: This may seem a bit like the "Grungestract Background Tutorial" by Trapezium at the start but it gets different at about the 3rd step :w:
Anyway. Open a blank canvas and choose your gradient tool. Set the mode to difference and the shape as Bi-linear, don't change anything else. Click and drag until you get a weird patern. Duplicate this layer and go to filters>edge detect>edge. Then set the layer mode to overlay and merge it down. Duplicate the layer again and now go to Layer>colors>invert. Now press shift F and click on the image, this should flip it. Set the mode to overlay and merge down.
(Hope you got all of that)
you should get this:
tut17wk.png


Now duplicate this layer and go to filters>noise>pick. Push the 2 bars up to 100 and then click ok. Once that has finished go to tools>color tools>colorize. Play around with it until you roughly get the same colour as the main colour of your render. Set this layer to over lay:
tut24nn.png


Ok make a new layer and paste your render on it so many times there is nothing left visible other then it. Go to filters>blur>gaussian blur and blur around 18 X 18 pixels. Set the layer to overlay.
tut34ch.png


Now put your render onto a new layer. Duplicate it and then go back to filters>noise>pick. Make sure the bars are still on 100 and then click ok. Set this layer to overlay.
tut41fs.png


There's that done.

For my text I just got the text tool, wrote what I wanted it to say in white and then I duplicated the layer and went to filters>glass effects>glass tile. Then I clicked ok to the automatic settings.Then go to filters>blur>guassian blur. Make it a 1 X 1 pixel blur. Set the layer opacity to 60%-ish. Then you make the glass tile layer below the normal text layer.

For my border I just made a new layer selected all then dumped in black went to select>shrink. I shrunk it by 1 pixel then hit ok then pressed ctrl X.

Well if anyone wants more screens I'll put them up, I was just in a rush :


_________________
kassig4ww.png
 
hey bros alguien sabe como hacer que una capa adquiera transparencia pero solo en una parte...es decir que baje la opcidad pero solo en una region no en toda...?...si sabeis poned la direccion o el tuto...os lo agradeceria...

___________________________________________________________________________

muy buena la intencion de poner los tutos directamente en el post pero seria bueno que fuesen en castellano...
 
Tutorial como hacer una splash-screen para GIMP

Visiten esta pagina hay varias cosas para aprender un poco mas sobre GIMP ;)
Espero q les sirva

http://www.gimp.org.es/


http://www.hachemuda.com/video-tutoriales-gimp/
Si pero es por eso poner paginas que el foro muere por eso los pongo aqui;)
SCREEN-SPLASH es la pantalla de inicio de GIMP

Hello once again class. Today we are going to learn about Splashscreens.
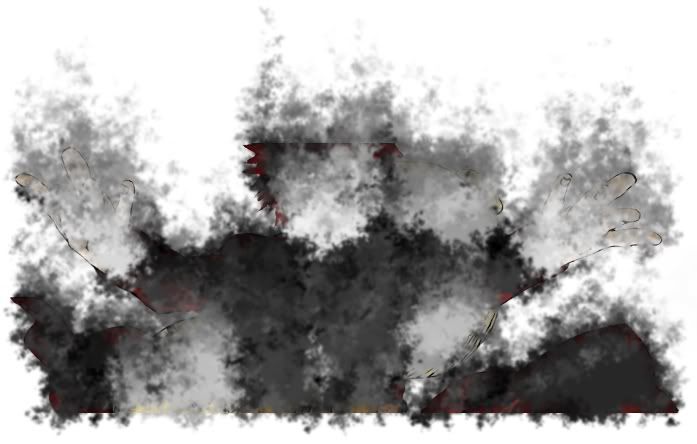
Example
(this was the final outcome of the tennis match between swmiller6 and myself. Some of it has been changed a little)


Are you tired of seeing the same old splash every time you open Gimp? Would you like to see your own, or possibly someone else's?

Well than this is the tutorial for you!

Creation of a SplashScreen

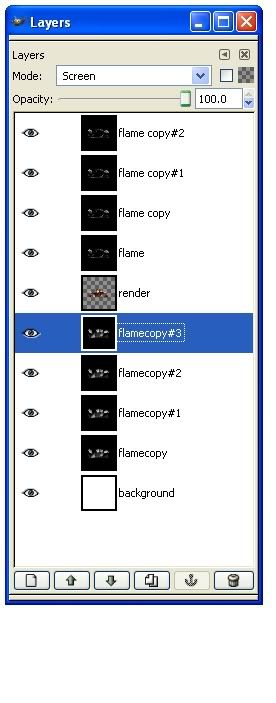
Ok first off we are not really creating one, but I will be showing you the general layout and how and where to save it.

A splashscreen is a png file the image size should be 400x300 and it needs to be saved as gimp-splash.png in your main Gimp directory. Not to tough to remember huh!
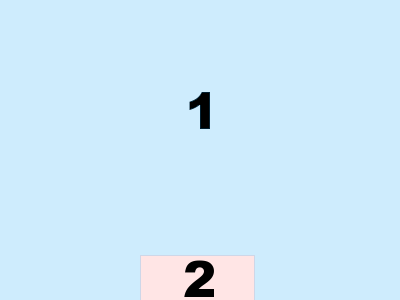
Layout Preview
splash_layout.png

I will explain the numbers!

1: This is the space that is open to put you beautiful art work in

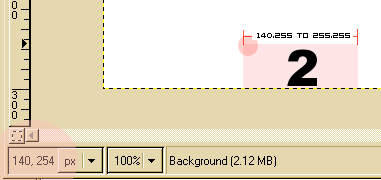
2: Ok this is the space that the text appears when you are loading Gimp. You know the loading brushes, Loading Fonts, etc. This space should be left blank or a solid color that way the text is easy readable. The pink box is located in this area 140,255 to 255,255.

TIP: Here is an easy way to mark out "The Pink Box" goto Image>Guide a little dialog box will pop up.
Now choose Direction:Horizontal Position:255
This will create a Horizontial line accross th bottom of the splash.
if you want to you can create 2 more Verticaly at 140 and 255.

points_example.png


Once you have created your masterpiece save it to C:\\program files\\GIMP-2.0\\share\\gimp\\2.0\\images (or what ever drive you have your gimp dir installed to) as gimp-splash.png. Restart gimp and You should see it right away!

!!!!WARNNING!!!!
Before installing your new splash make sure you back up the old one or have a good friend who has a copy of it.

Well class that is about it. I hope to see your creations.

Quick Reference:
Image Size: 400x300
File Name: gimp-splash.png
Save Location: C:\\program files\\GIMP-2.0\\share\\gimp\\2.0\\images (or what ever drive you have your gimp dir installed to)

Download The Template xcf I created for this tutorial!
Splashscreen Template by Droz928


Fuente
Ejemplo la mia:
gimp-splash.png

Enjoy;)

 
No mijo la graciases q la gente encuentre la mayor info en una buena pagina web , pues lo necesario para empezar ....... ;)
 
la verdad a mi me parece que esto de los tutos si estan en otra web es mejor colocar solo el link...para no saturar el foro...pero si ha sido uno el que ha hecho el tuto o si es de un libro, amigo, cd o cualquier baina que no este on-line si ponerlo aca directamente.

______________________________________________________________________________________

muy buenas capsulas...
http://www.gimp.org.es/ recomiendo que se inscriban.......
 
  • Me gusta
Reacciones: 2 personas
hola miren el amigo jonatan me dio mas o menos una explicada de como combinar un render con un fondo pero la verdad es que no me sale nada

si alguien de ustedes expertos con el gimp me pasa un tuto de esto o me lo explica aqui con terminos facilitos mejor por favor ya que estoy interresadisimo en hacer firmas

contactenme a bakel_citrix@hotmail.com

y denme consejos porfa

tengo gimp portable

chekense aqui hay buenas cosas

http://erdd.net/only-gimp-f11/fusion-de-renders-en-gimp-t112.htm
 
man es que sinceramente cuando empieza con lo de las firmas lo que hace es leer y aplicar todos los tutoriales que encuentre... despues de tener buena practica los empieza a combinar y a crear un estilo propio....

la forma que yo le dije simplemente es una de tantas que se pueden hacer, es mas cuestion de practica y leer los tutoriales....

ha y claro paciencia, porque cuando uno empieza siempre las firmas quedan remal, pero poco a poco se va mejorando... yo he hecho ya varias, aca unicamente he posteado las que me parecen que han quedado aceptables...
 
hey bros alguien conoce un tutorial sobre como hacer llamas.....es que ahora que lo pienso las mias siempre salen asquerosas......
 

Archivos adjuntos

  • flama1.jpg
    flama1.jpg
    36 KB · Visitas: 131
  • flama2.jpg
    flama2.jpg
    47.8 KB · Visitas: 125
hola, pues me kiero descargar el programita Gimp pero primero me gustaria saber cuales son los rekerimientos basicos de sistema para usarlo porke la verdad el mio es muy medio pelo y prefiero evitar complicaciones y blokeos.

muchas gracias
 

Los últimos temas